Introduction
Kubernetes is an open-source system for automating deployment, scaling, and management of containerized applications to increase the productivity of the developers. Containers are a good way to bundle and run your applications. In a production environment, you need to manage the containers that run the applications and ensure that there is no downtime. Kubernetes applications can be deployed in the cloud and to Kubernetes clusters hosted in other environments. By using the containerized applications we can have testing environments similar to production which can catch issues earlier in the process.. Kubernetes deployments allow you to build application services that can run in multiple containers, schedule those containers across a cluster, scale those containers, and manage the health of those containers over time. Kubernetes has transformed the application development model.
Continuous Integration (CI)
Continuous Integration (CI) is a process that allows developers to integrate work into a shared environment; for example pushing code to development quite frequently as needed, This enhances collaborative development. Frequent integration helps dissolve silos, reducing the size of each commit to lower the chance of having an issue in the pre-production or production environments. CI workflow starts from listening from the source code management (SCM) system, to building the source code and deploying to a shared development environment and then running any Integration tests.
Continuous Delivery/Continuous Deployment (CD)
Continuous delivery extends the continuous integration process by deploying builds that pass the integration test suite to a pre-production environment.This makes it straightforward to evaluate each build in a production-like environment so that developers can easily validate bug fixes or test new features without additional work.
Once a build passes automated tests in a pre-production environment, a continuous deployment system can automatically deploy the build to production servers.This enables teams to release new features and bug fixes instantly.
Importance of End-to-End Pipeline
The advantage of the end-to-end pipeline in ReleaseIQ is the developer, project manager, team lead, and DevOps team can have visibility from check in of code until it is being deployed to production. Key is the visibility to debug the issue when there is a failure on any step. The deployment to a specific environment can be tested thoroughly using automated or manual tests. Deployment control can be given to the application owners whether to proceed with deployment or to reject the deployment. Team members can backtrace performance and infrastructure issues as well.
Single Microservice E2E Pipeline
We can use ReleaseIQ to deploy a single microservice from SCM to production. The workflow consists of listening from SCM, building the source code, uploading the binary to a build repository, deploying to a test environment, running an automated test for deployment verification and if the verifications are successful, deploy to the production environment.
Use Case #1 – Using ReleaseIQ Internal Capabilities
The workflow for the use case is listening from SCM, building source code using Maven or Gradle, pushing Docker image to a build repository, and deploying to Kubernetes using the Helm via ReleaseIQ.
Prerequisites:
- Create Product, Team, and Component for the Use Case.
- Configure the Source Control Management in Settings.
- Configure the Build Repository in Settings.
- Configure the Environment with Appropriate Kubernetes Cluster Configuration.
- Verify the Helm configuration files with these samples.
Configure the Internal Build Configuration as below in Build Step:
- Choose Build Tool Name as Maven
- Select Maven Version from drop-down
- Enter the goal of Maven
- Select the Java version
- Select the Build Repository name and File Repository.
- If you want to Scan the Deliverable select the checkbox
- If you want to fail the pipeline if there is any vulnerability, select the fail pipeline checkbox

Configure the Internal Deployer Configuration as below in Deploy Step:
- Select the Environment which is configured with Kubernetes cluster
- Select the Deployer tool Name as “Internal Deployer Tool”
- Choose the endpoint of the cluster
- Select Deployment Type as “Helm”

Choose Add Helm Configuration:
- Select the SCM, Repository, Branch name, and path which contains the Helm Deployment files.
- If you have multiple YAML files for Deployment add those file names in the Deployment files text box
- Enter the Namespace where we want to deploy the Application.

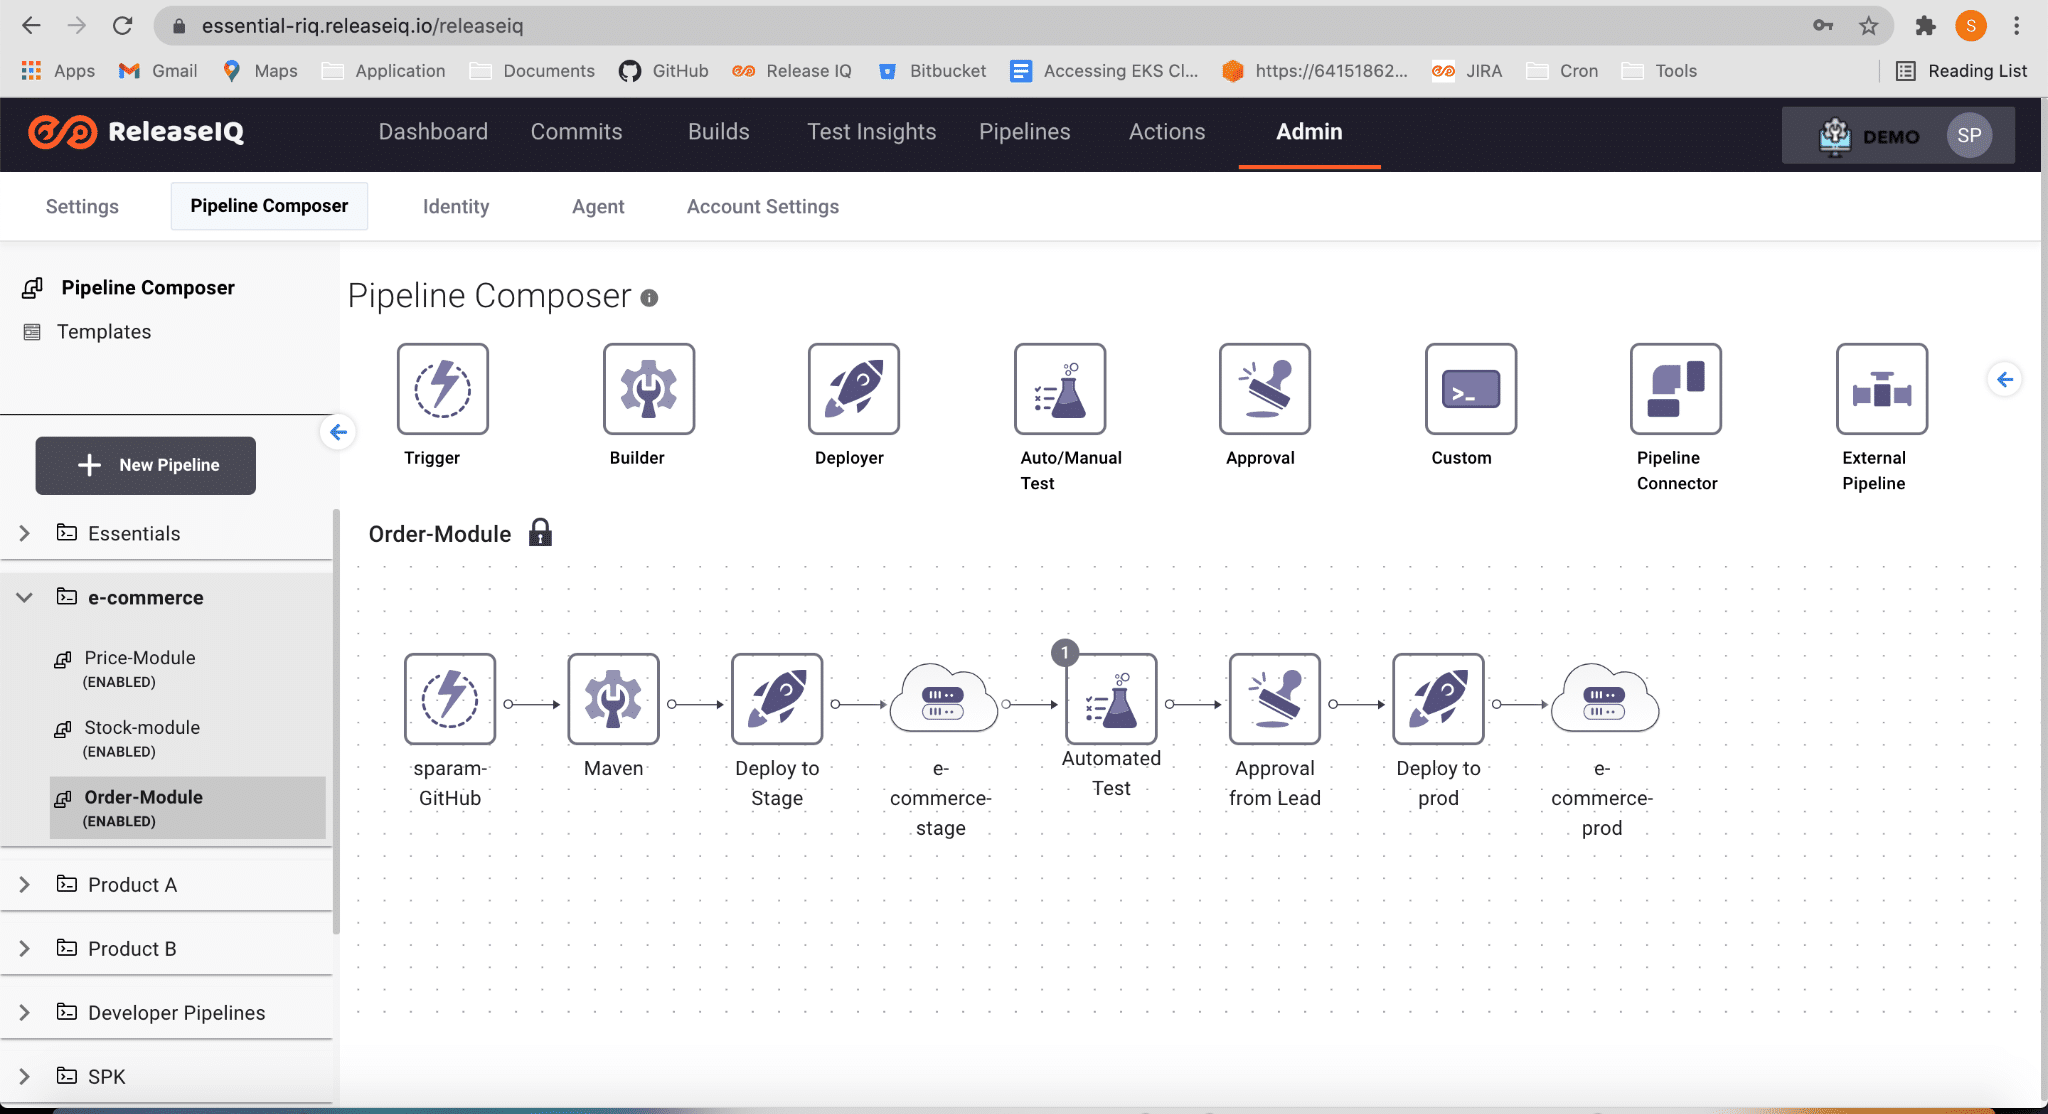
The overall End-to-End Pipeline will look like this:
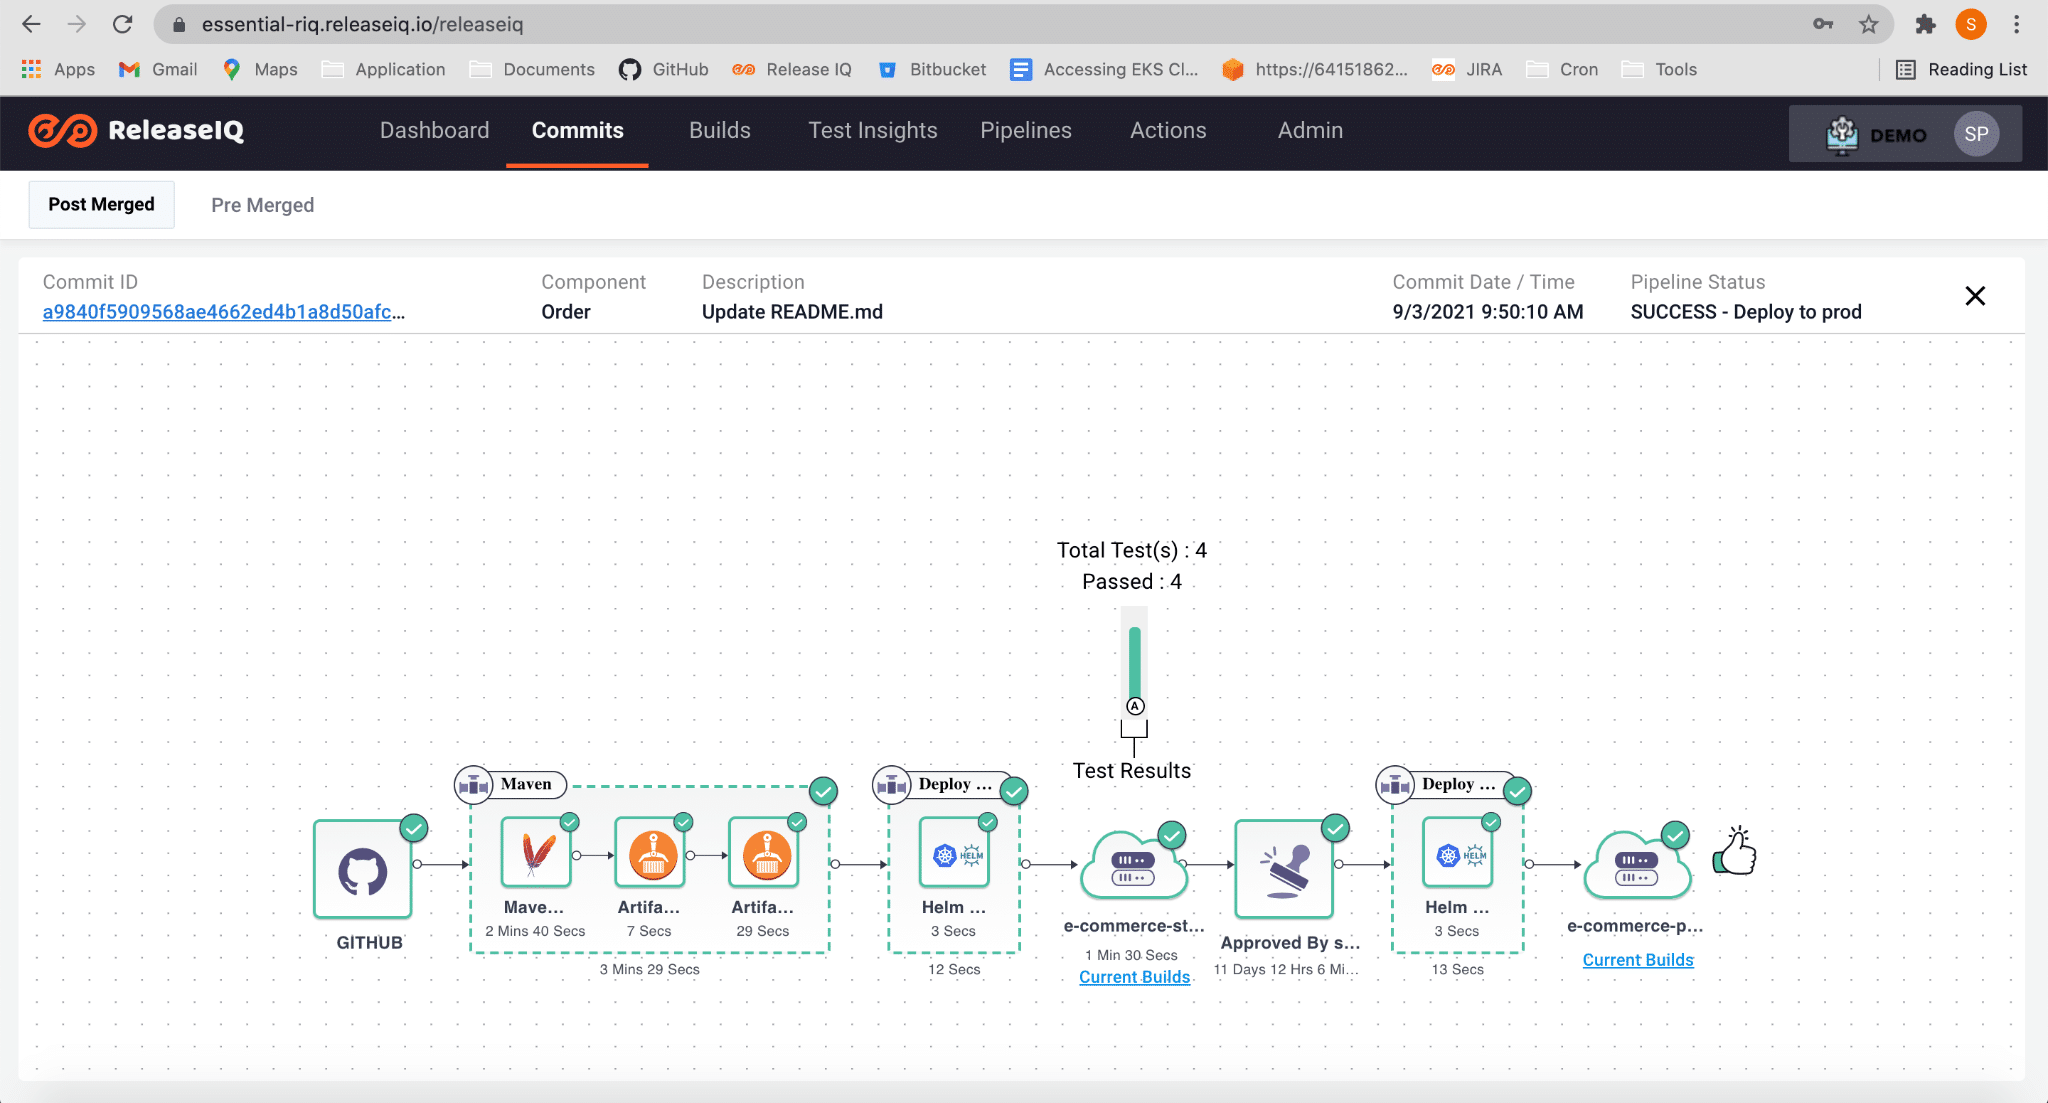
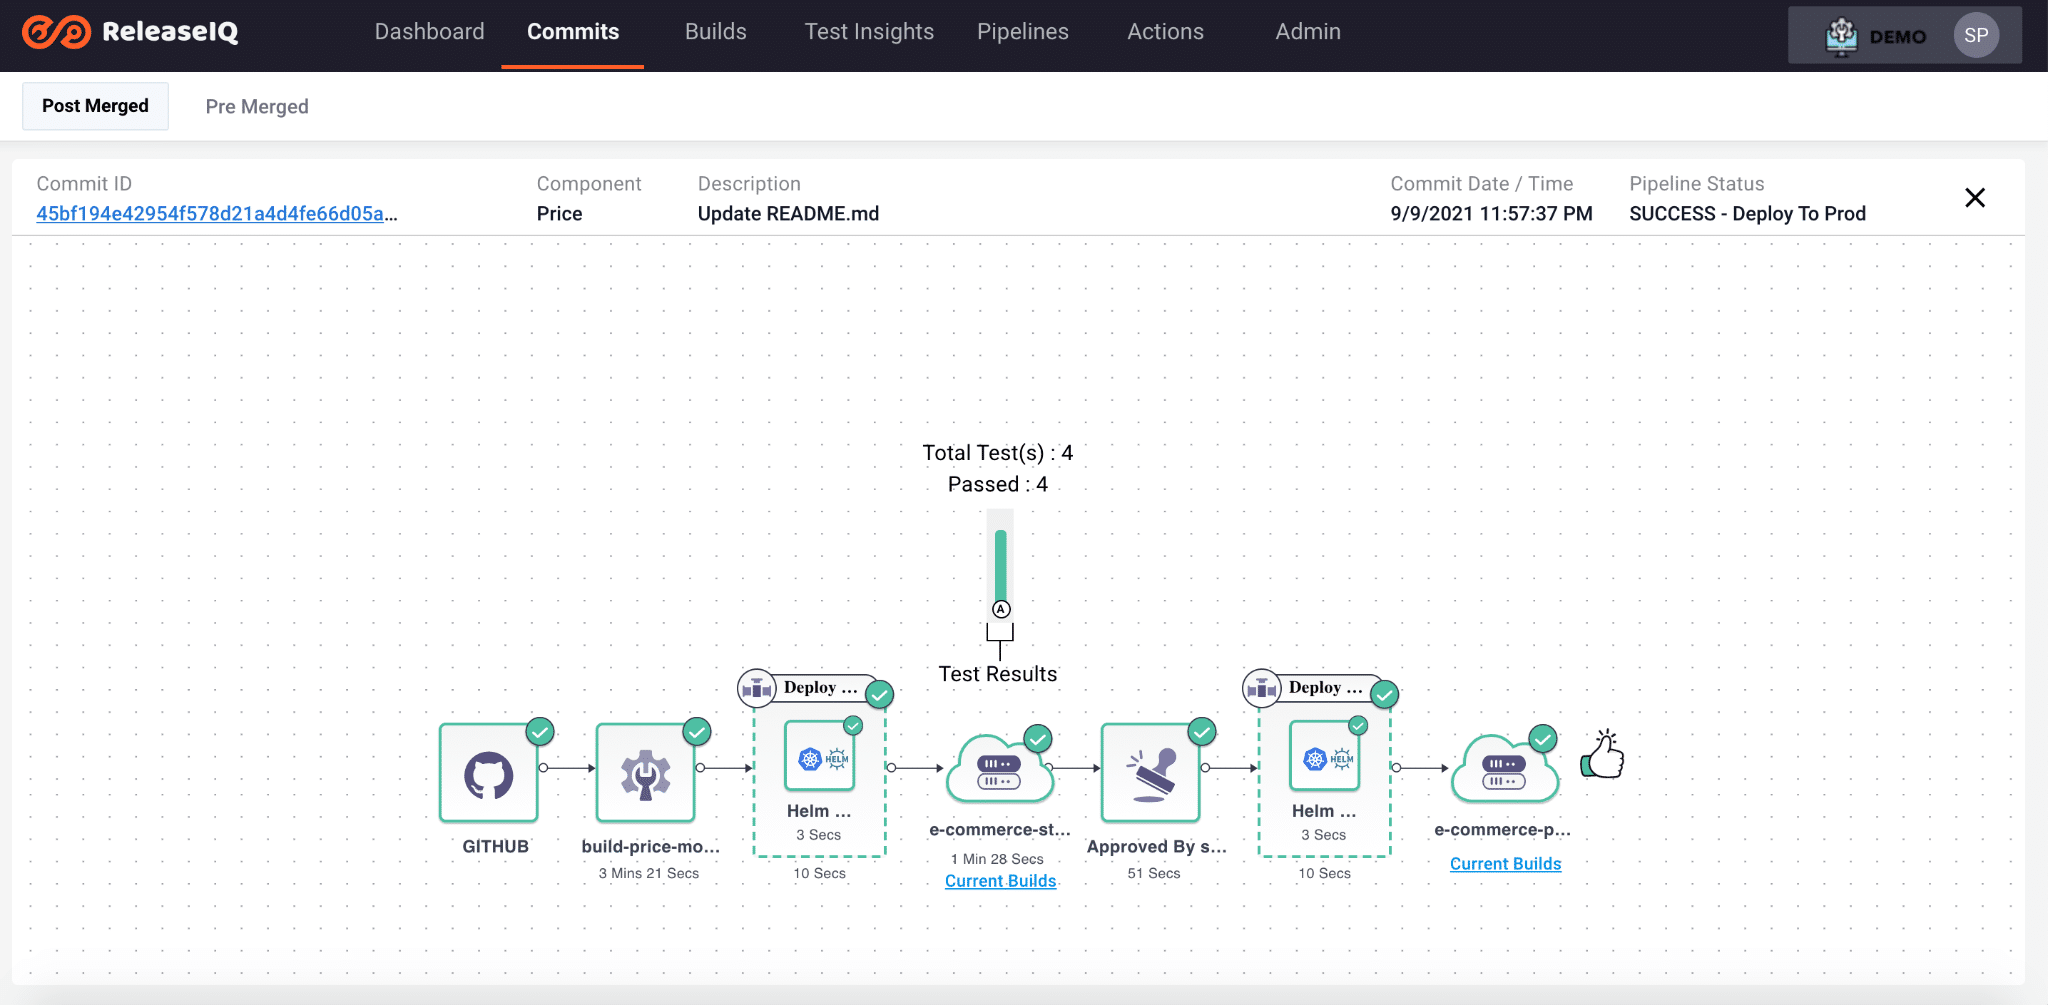
The pipeline execution will look like this:
Use Case #2 – Using Jenkins for push to build repository
The workflow for the use case is listening from SCM, building source code, pushing Docker Image to a Build Repository using Jenkins, and deploying to Kubernetes using Helm via ReleaseIQ.
Prerequisites:
- Create Product, Team, and Component for the Use Case.
- Configure the Source Control Management in Settings.
- Configure the Jenkins CI Tool in Settings.
- Configure the Environment with Appropriate Kubernetes Cluster Configuration.
- Verify the Helm configuration files with these samples.
- Archive the Build Location and Build ID in the Jenkins Job/Pipeline.
Configure the Build Step as Below:
- Select the Jenkins CI Tool configured in the Build Tool Name.
- Select the Jenkins Job or Jenkins Pipeline that build and Push Docker image to Build Repository.

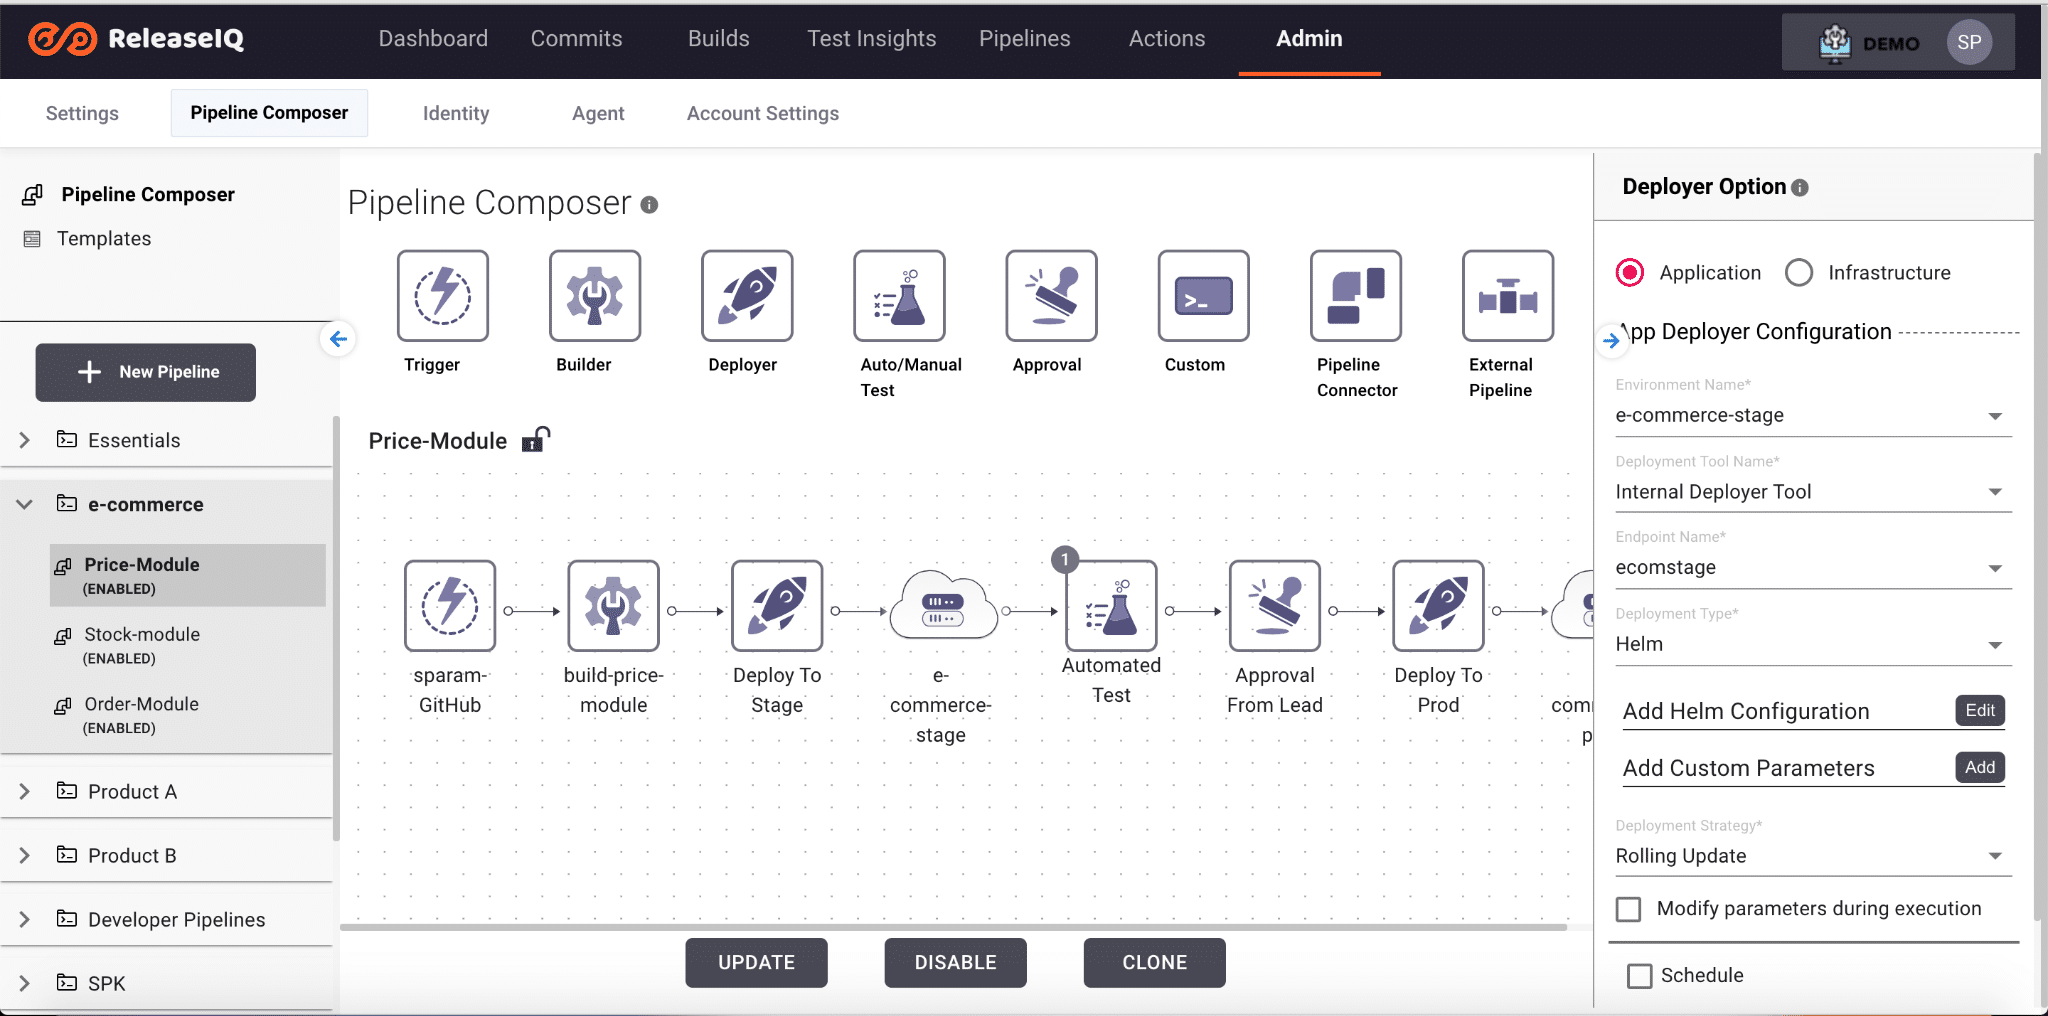
Configure the Internal Deployer Configuration as below in Deploy Step:
- Select the Environment which is configured with Kubernetes Cluster
- Select the Deployer tool Name as “Internal Deployer Tool”
- Choose the endpoint of Cluster
- Select Deployment Type as “Helm”
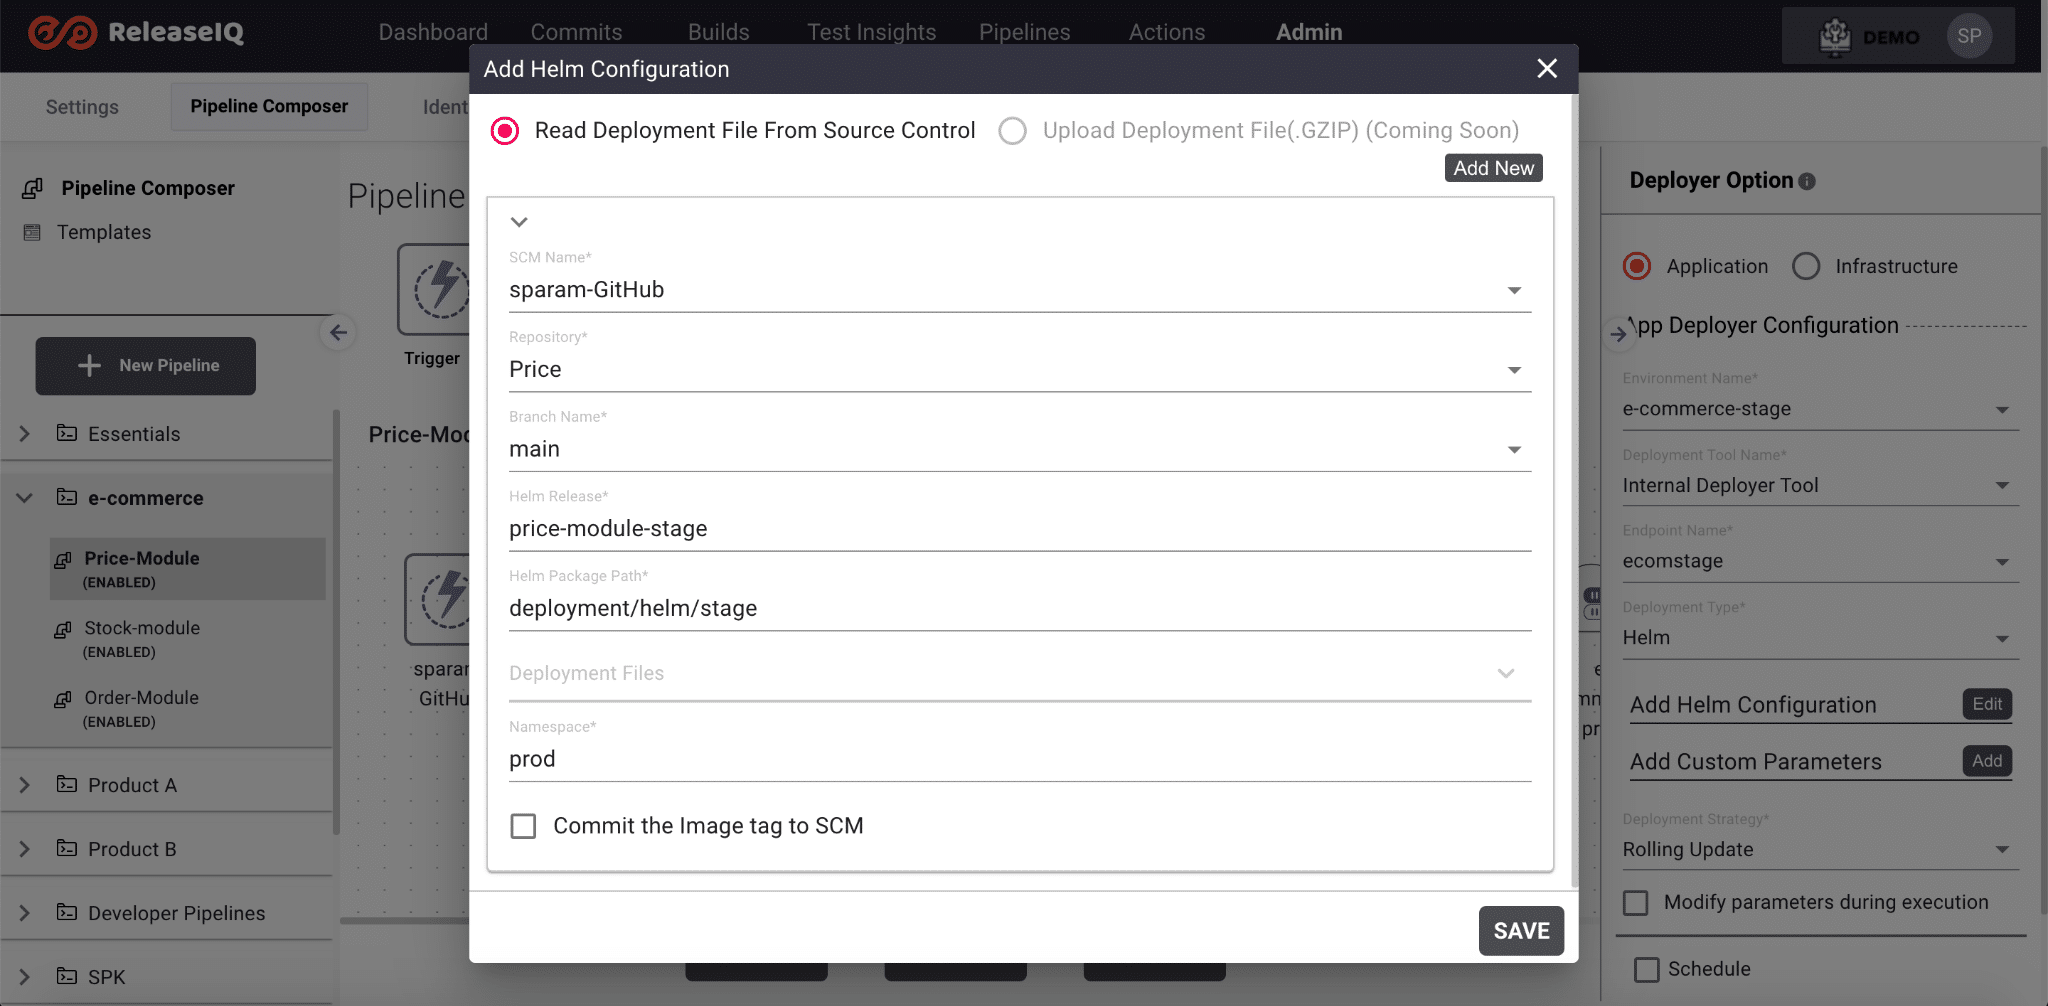
Choose Add Helm Configuration:
- Select the SCM, Repository, Branch name, and path which contains the Helm Deployment files.
- If you have multiple YAML files for Deployment add those file names in the Deployment files text box
- Enter the Namespace where we want to deploy the Application.
The Overall E2E Pipeline will look like this:

The Pipeline Execution will look like this:
Multiple Microservice CI/CD E2E Pipeline:
There are many scenarios where we have multiple microservices for an application. These microservices could be dependent or Independent. We may want to deploy the microservices one by one if they are independent and we want to deploy multiple services together if they are dependent. Also we want to deploy the microservices together at a scheduled time or we may want to get some approval before the deployment. ReleaseIQ can easily implement these scenarios and many others.
Use Case: The workflow for the Use case is two CI pipelines connected to a CD Pipeline.
CI Pipeline #1:
Listening from SCM, Build Source code using Maven or Gradle, Push Docker Image to a Build Repository and Deploy to Kubernetes using Helm via ReleaseIQ. Configure the CI pipeline same as single microservice Use Case #1 and add a pipeline connector to connect to the CD pipeline.
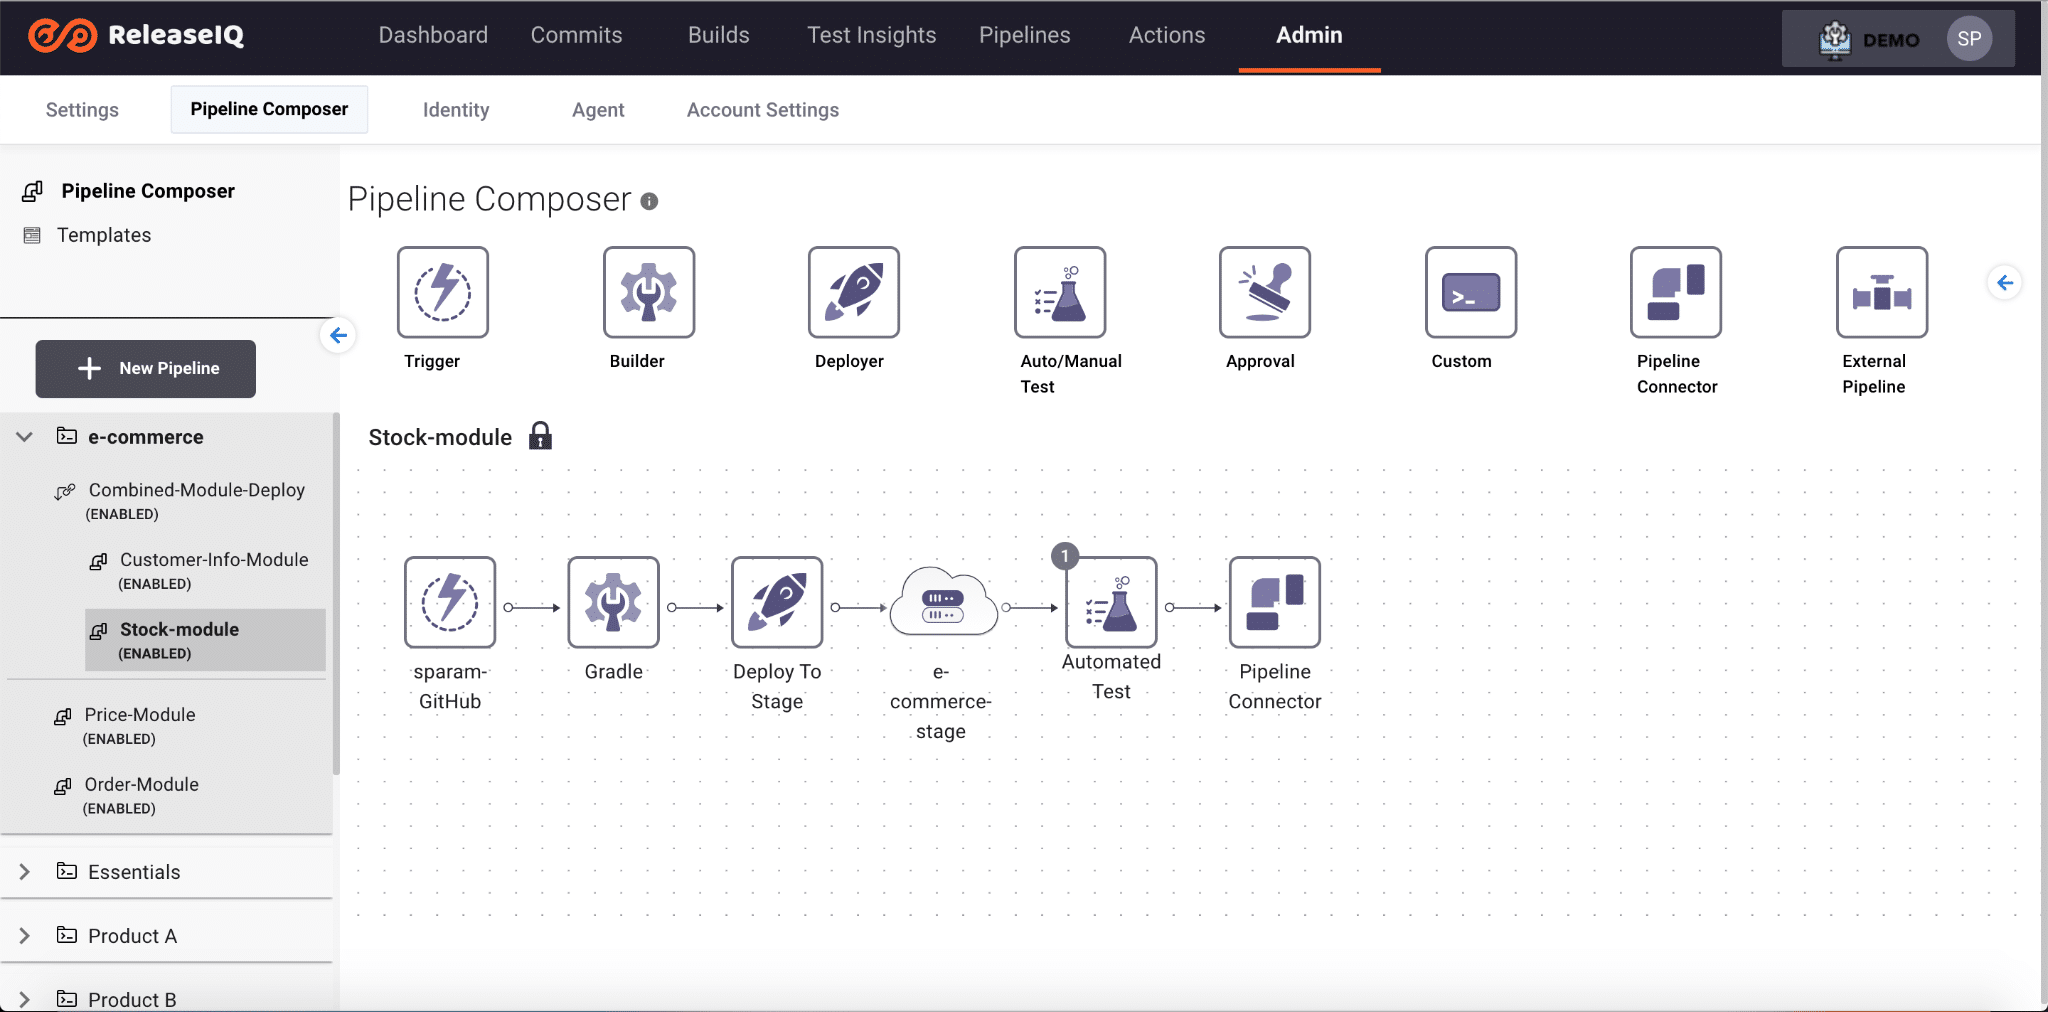
CI Pipeline #2
Listening from SCM, Build Source code Push Docker Image to a Build Repository using Jenkins Tool and Deploy to Kubernetes using Helm via ReleaseIQ. Configure the CI pipeline same as Use Case #2 and add a pipeline connector to connect to the CD pipeline.
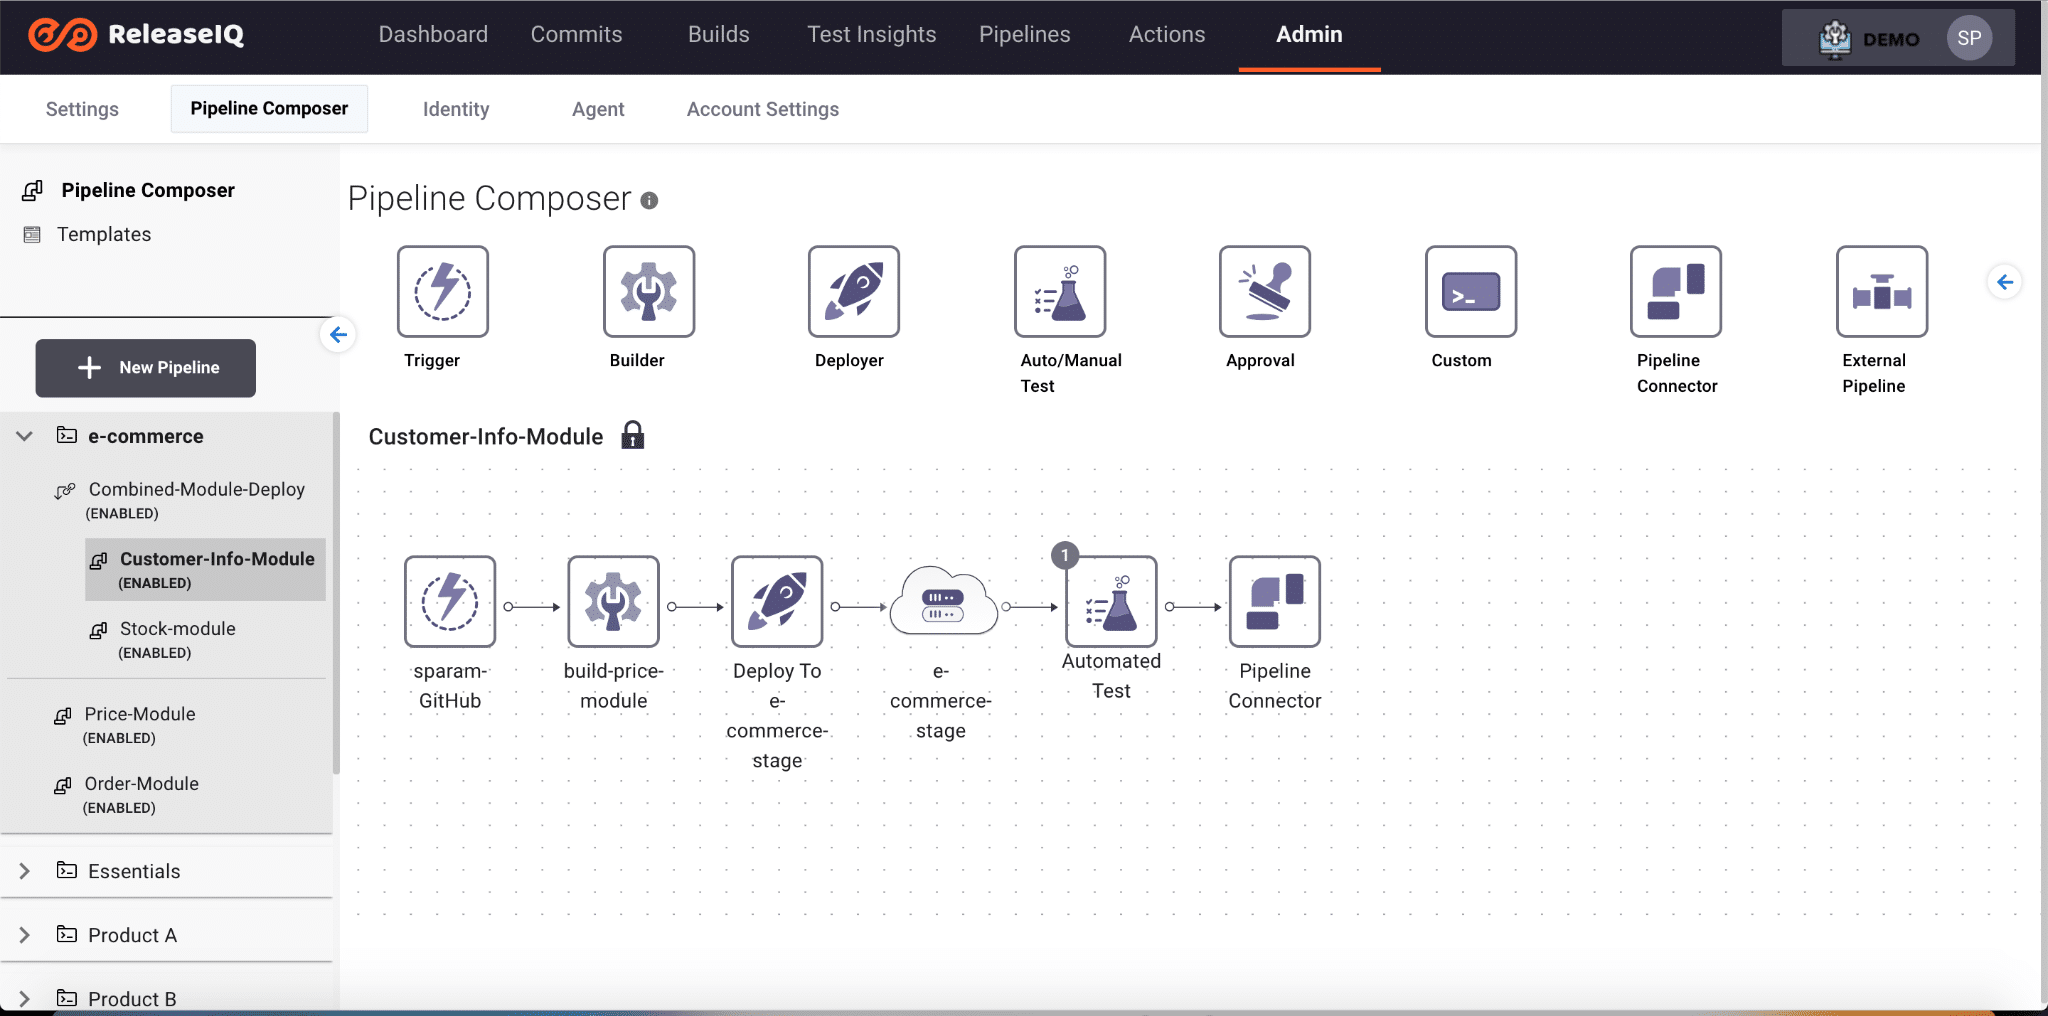
CD Pipeline
Prerequisites:
- Create Product, Team and Component for the Use Case.
- Configure the Source Control Management in Settings.
- Configure the Build Repository in Settings.
- Configure the Environment with Appropriate Kubernetes Cluster Configuration.
- Verify the Helm configuration files with these samples.
Configure the Internal Deployer Configuration as below in Deploy Step:
- Select the Environment which is configured with Kubernetes Cluster
- Select the Deployer tool Name as “Internal Deployer Tool”
- Choose the endpoint of Cluster
- Select Deployment Type as “Helm”

Choose Add Helm Configuration:
- Select the Linked CI Pipeline Name as CI Pipeline #1
- Select the SCM, Repository , Branch name and path which contains the Helm Deployment files.
- If you have multiple yaml files for Deployment add those file names in the Deployment files text box
- Enter the Namespace where we want to deploy the Application.
- Click Add new and follow the above steps for CI Pipeline #2.

The CD Pipeline looks like below:
The Pipeline Execution will look like this:


